make it
Showing posts with label make it. Show all posts

A Summer Sketchbook Kit

July 8, 2021

No comments

We're hitting the full swing of summer and my kids love screen time. Which is all good, sometimes, and I try to find a natural balance between being relaxed about it and making sure they have plenty of other options on hand as well.

A summer sketchbook sounded like such a fun idea to incorporate. They are packable and we can easily toss them in the car for an afternoon at the park or on a road trip. Inspired by lots of Pinterest images and this post by Kelle Hampton.  

The kids and I picked out the supplies together and filled their kits with:

Crayola washable watercolors (we'll bring along a plastic bowl and some water for this!)
Kid scissors
Tape
Pencils (and a travel sharpener)
Sketchbook
Colored pencils 

Everything fit perfect inside these mesh bags from Michaels.
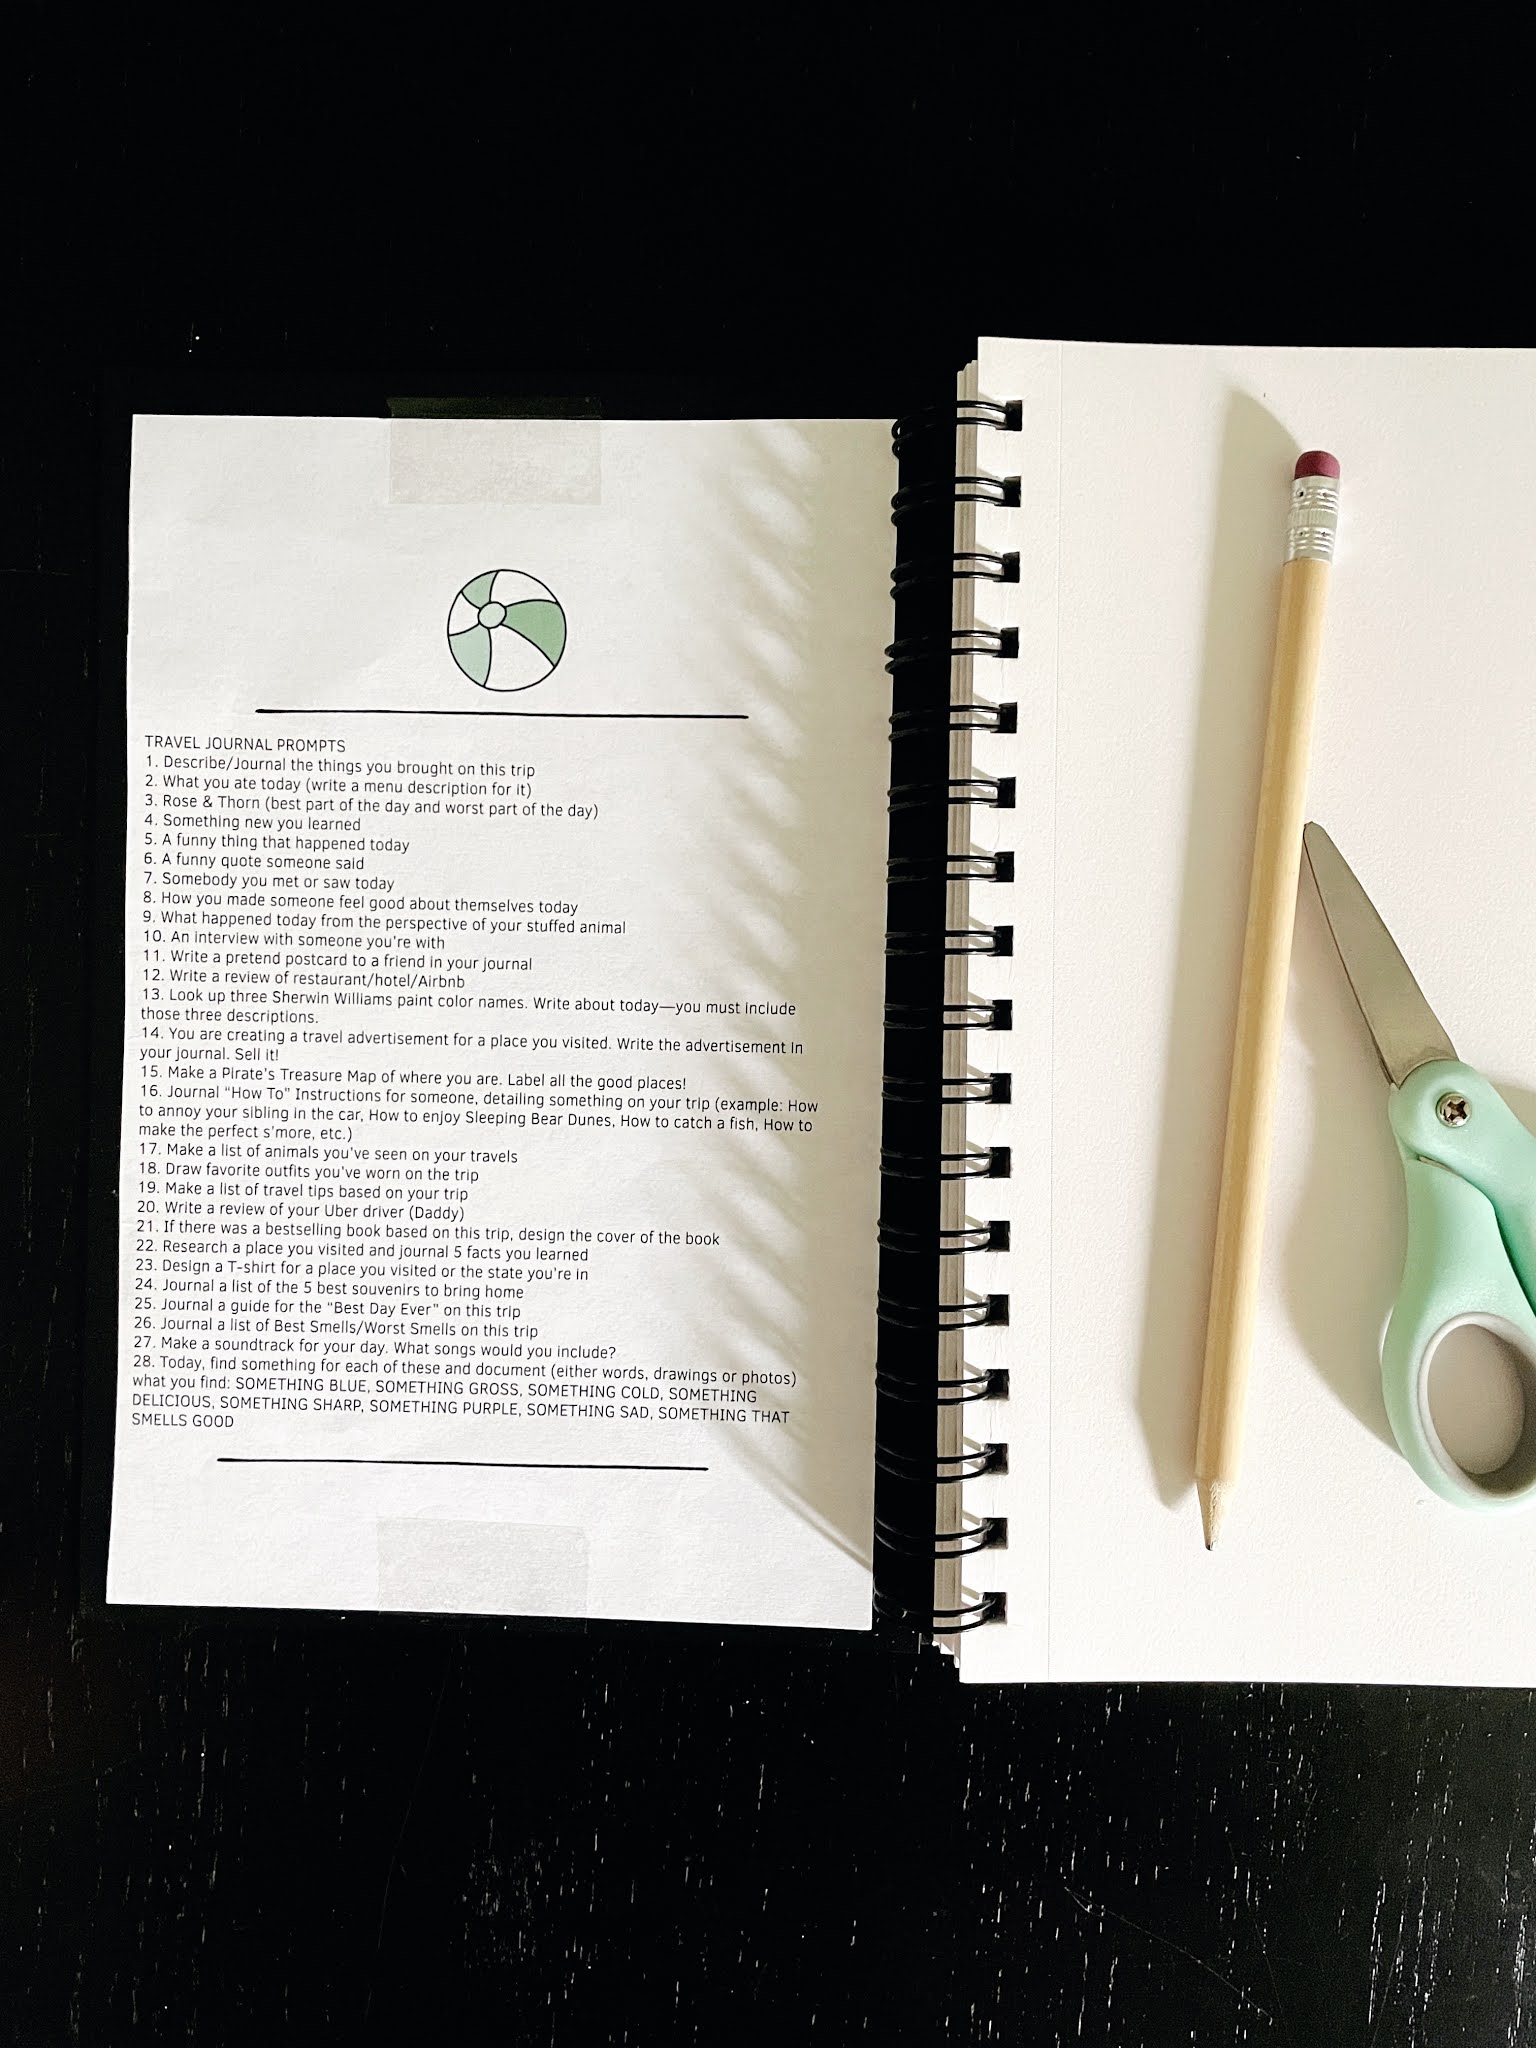

I also taped this list from Kelle's post to give the kids some ideas when they are feeling uninspired or need a quick plan. 

I'm hoping we'll have lots of watercolor drawings of all of our summer adventures that make up one magic-filled summer story!
Read More

How To Style Grocery Store Flowers

June 8, 2021

No comments


Fresh flowers are one of my most favorite things! There's just something about a gorgeous flower arrangement that brightens my mood. But, they can be expensive (and rightfully so!). But, I thought I'd try my hand at pulling together a scaled down version of some of my favorite arrangement ideas.

Grocery store flowers! Don't knock them until you try them. When I ran my party business, I almost always used grocery store flowers. They are fairly inexpensive and between a few of my favorite grocery stores, I could usually find what I needed. 

As far as grocery store flowers go, I'd say Trader Joe's is the best. My closet TJ is about 2 hours away though so I stick with Publix and Kroger and occasionally The Fresh Market. 


I grabbed these on a whim when picking up some things for dinner so the choices were pretty limited. I picked up a bundle of beige carnations, a filler bundle that caught my eye, and a handful of greenery. Eucalyptus is my go-to but when my store is out, I settle for whatever greenery I can find.


The arrangement cost me around $12 and took me about 20 minutes or so. I taped off a grid pattern on a vase to help structure the arrangement then I started trimming down all my flowers and put them all in a pile to pull from.

I started with greenery around the outside and a few pieces on the inside then used the carnations and fillers as the bulk of the middle of the arrangement. I personally prefer more greenery with pops of color so I will definitely be doing this again when I can shop around for more options! 

I love to use non-traditional vases - milk jugs, vintage crocks, glassware I've painted. The less typical "vase shape", the better. Target usually has a few great vintage-style crocks every season and thrift stores are fun to pick through.


At the end of the day, I've got a pretty good arrangement for $12 and it's definitely bringing some light and joy this gloomy, rainy week! 
Read More

A Textured Art DIY

March 5, 2021

No comments
I have been tackling small projects around the house lately! Switching up art work, restyling shelves, and anything else that crosses my mind to freshen up. It never fails that spring starts to roll around and I want to give the house a shake up!

This textured art project was the perfect one to try. Inspired by a post I saw on Instagram recently and the ever popular trend lately to cover stuff in joint compound/spackling/mud and bring some beauty to an old piece (that I've been meaning to do forever!). 


You're going to need: 

  • A old framed print, piece of art, or canvas (I used a large framed print I got at Ikea years ago that's just been collecting dust in the guest room) 
  • Spackling compound
  • A putty knife
  • Tape
  • Paint

This was so easy and and cost under $12 (with plenty of spackling left for another project)! 


Ok, tape off your frame! Painters tape is great but I didn't have on hand so washi tape it was! In light layers, just slap it on with a putty knife until the entire piece is covered. Spread it in different directions until you've got a texture and interest you like! And, get your kiddos involved! My little guy loved helping spread on the compound.

Then let that gorgeous piece dry, probably overnight.


When it's dry, just remove the tape and fill in any gaps around the edge. I alternated between my fingers and a small angled spreader I had on hand. Let that dry and you're done!


I styled mine and sat with it a few days and realized that the putty dried a little too pink for me. So, I grabbed a small bottle of white acrylic paint and did a few light coats over it! I just tried to feather it and then fill in the larger textured gaps to cover all the pink and blend it well. 


I really didn't put a lot of thought into it. Natural and easy was what I was aiming for. And, I love it! It's a great statement piece and mine is extra special since my kid helped me create it. 


Read More

MAKE IT | A FAIRY GARDEN IN A JAR

April 13, 2018

No comments
I have had plans in the back of my mind (and a gallon of paint in our garage) waiting on me to finally start on Lia's bedroom makeover. It needed a fresh coat of paint and lately she's mentioned that the current pink is just "too light". 

We tend to tackle projects while the kids are out of town. And this week, even though it's only L out of town, Nico has been attached to my side when it comes to who takes him potty and makes his snacks and tucks him into bed, so we figured that M would have some free time to tackle the paint job while Nico and I shopped around for new pieces to pull together the space. We happened to be in Michael's picking up a couple of frames and I popped down the fairy garden aisle. Lia has been asking to make a fairy garden and I just haven't brought myself to do it. I don't know what it is - all the tiny breakable pieces, the fact that it has to go outdoors, etc. - but I always just say "maybe later". But I had an idea when I was in the aisle and things were on sale and I hope it's a good enough compromise for now!

I grabbed a jar with a lid, some green moss, and 2 tiny treasures. This DIY is incredibly easy and pretty inexpensive since everything was on sale.


I filled the jar up with the moss about a 1/4 of the way or so.


I realized that I kind of had to just drop the pieces in since my jar was tall and the mouth of it wasn't wide enough for my hand to fit through. So, I eyeballed where I wanted them, gently dropped them in, and then took kitchen tongs to readjust once everything was in.


Once I was done and had everything settled, I wiped around the top of my jar with a slightly damp paper towel to get the extra moss residue off. 


 Tada! I kept it pretty simple so that she can pick out one or two more small things to add on her own. I think if this is a hit with her, we may move on to something slightly bigger like this terrarium!

Read More

A DIY SNOWGLOBE

December 12, 2017

No comments

My love of mason jars and adding new holiday decor every year pair up in this fun + easy DIY!

We love snowglobes around here but we also love kid-friendly decor and snowglobes are heavy, full of water, and not always cheap. So, we've made our own the past couple of years at Christmas time!

All you need is a hot glue gun, a couple of mason jars, tiny bottle trees, snow filler (I found ours at Michaels!) and a few spare minutes. 


See? Easy, inexpensive, and so much fun! Even though these are made of glass, they aren't as heavy as usual snowglobes and with a little supervision, we let the kids shake them up to watch the snow. Fun parents, happy kids, and festive decor for the win!


SaveSaveSaveSaveSaveSave
SaveSaveSaveSaveSaveSaveSaveSaveSaveSaveSaveSaveSaveSaveSaveSaveSaveSave
Read More

DIY ACTIVITY TRAY

June 22, 2015

No comments
Summer is here! It's getting really hot out and most days the idea of spending a few hours outside seems unbearable. I try to keep the kids happy and cool with air conditioning and Popsicles for the big one but they get a little stir-crazy when it's summer and they are stuck inside.

So, I looked through my pinterest board, saw this and was inspired to create one!


You'll need :
A box or a tray. We had one leftover from some Melissa and Doug play food.
Beans or rice. I picked up a cheap bag of lentils.
And some small toys.

Just fill your box with beans, add a few toys and let your kids have fun!

L loves the dinosaur box. I picked up a bag of the dinos & trees for a dollar at Target. The trucks are great for scooping and dumping when you can't get to the park. And, possibly my favorite - a word game! We used tiles from this game to hide letters from a list of words that we can find.

I think we'll store our beans in a ziploc bag and pull the tray out on those days we need a little something extra!

Read More

A PLAY GARDEN

May 2, 2013

4 comments

inspired by this pin, we set out to create L a fun little play garden last week. armed with a bag of organic garden soil, pink flowers, a strawberry plant and mini-sized garden tools we dug out of the garage, we got to work. okay, M got to work because he's the guy and he knows how to do the dirty work like digging up the sod and creating the shape of the garden.

but L and i planted everything and she's been having fun since. it's so much fun to watch her do her gardening thing and i love that she is learning about nature and being good to our planet.

i have a feeling the garden will always be a work in progress. eventually i want to add some herbs and veggies and i am sure we'll let her pick new flowers every spring and fall.

the details:

M carefully dug up some of the sod so we could replant it elsewhere and then he used a shovel and edger to cut out the shape we wanted the garden to be. ours is about a 5x5 section against the fence in our backyard.

after we had the section cleared out, M used the edger to put the little border up so it would stay in place. we just picked up a roll of 10 ft border at home depot for around $7 and we cut it in half to leave an opening.

we raked through the dirt to loosen it up and get the bigger clumps of grass out and then we topped it off with the bag of organic garden soil. you can use any soil, we just grabbed the organic one because it was cheaper and was okay for vegetables and flowers.

we planted some pink annuals that L picked out, a strawberry plant and we transplanted some sunflowers and misc herbs that she had planted in a milk jug during preschool one week. we also left a chunk of grass in the corner to hold the "grass man" (a library project) and it will also be the future home of some painted rocks. once i find rocks and she paints them!

and that's it. she usually goes out and plays a little each day and i remind her to water her garden. otherwise, we let it be and the rain helps us out every now and then.

it was a fun and relatively easy project. if you make one, i'd love to see it!


Read More

DIY | FELT ROSETTE WREATH

October 8, 2012

1 comment
happy monday. it's a new week and i am excited! i am determined to get the house organized & clean, sell the rest of our yardsale leftovers from the weekend and prepare more for the move.

m is off today, we'll be taking care of eye appointments and some errands. we've got some playdates this week and lia starts preschool! we're trying out a small preschool co-op with some other mamas & kids from our moms group.  i am praying it is a good thing for lia. she can grow to be a bit more independent, learn some new things and get more socialization! plus, this mama will get about 2 hours to herself each week (minus my week to host). besides naps, i rarely get alone time. i can actually plan a trip to target or accomplish errands easily. i think it will be good for all of us.

and this weekend, we are taking a trip to the state fair and ikea! it's about 8 hours round trip, so not far from home, but this is the first trip we've taken as a family not to visit family. so it's a big thing around here! we all need some special time together and hopefully we'll come back our this mini trip resfreshed and ready for the daily grind again. its wearing on us all a bit.

so because i made this a few weeks ago and i am in love with it. and because i know you all can appreciate a good DIY, i bring you this felt rosette wreath. these would make great christmas presents! or just an 'you are so awesome + i appreciate you' gift.

i LOVE making these felt rosette wreaths. i made a spring/summer one a few months ago and i knew i wanted one with mustard and gray tones so it would look great with the pumpkins that adorn our porch.

it took me about 2ish hours, start to finish.


i can't wait to hang this up at our new house!

Read More

MESS-FREE FLASHCARDS

September 18, 2012

2 comments
in my attempt to be more of an intentional parent and to do a craft i have planned to do for over a year now, i give you mess-free flashcards!

seriously, it's easy. and i am lazy when it comes to crafting. no matter how many awesome things i pin and swear i am going to do.

i have just felt like i am going through movements of our day and not really sitting down & making sure i take the time i should to teach lia everything i should. she is really smart and learning SO much these days. it makes me wonder how much else she could know if i slowed down and was more intentional about my parenting.

so i've been thinking of schedules for us and things we can do together. i whipped up these handy little cards last night.

now when we sit down and play with these cards, we're not playing billion card pick-up. that's not really my favorite game.


so you basically punch holes in your cards. disclaimer: i had to do one card at a time. my little hole puncher wasn't so strong.

i picked up the rings at walmart. they were like $1.50 for a pack of 8 or something. put your cards on the ring and you are finished!

after i was done, i took about 10 minutes (all the patience L had left for me) and we went through all the cards and we did some numbers in english & spanish. i think i need to make a set of flashcards for the numbers.


someone really likes my idea!


and...


because who doesn't love confetti? 


enjoy!
Read More
Copyright © KRISTY EVERYDAY. Blog Design by SkyandStars.co